Seeing your dog in a life-threatening situation can be a frightening and stressful experience, especially if the dog is unresponsive. Equipping yourself with the knowledge to effectively recognize and take action treating your dog’s condition can keep you calm and greatly increase your dog’s chance of survival. Two life-saving procedures you need to know are artificial respiration and CPR for dogs. This article will outline how to identify whether your dog needs artificial respiration or CPR, and how to perform those procedures.
Evaluate Your Dog’s Condition
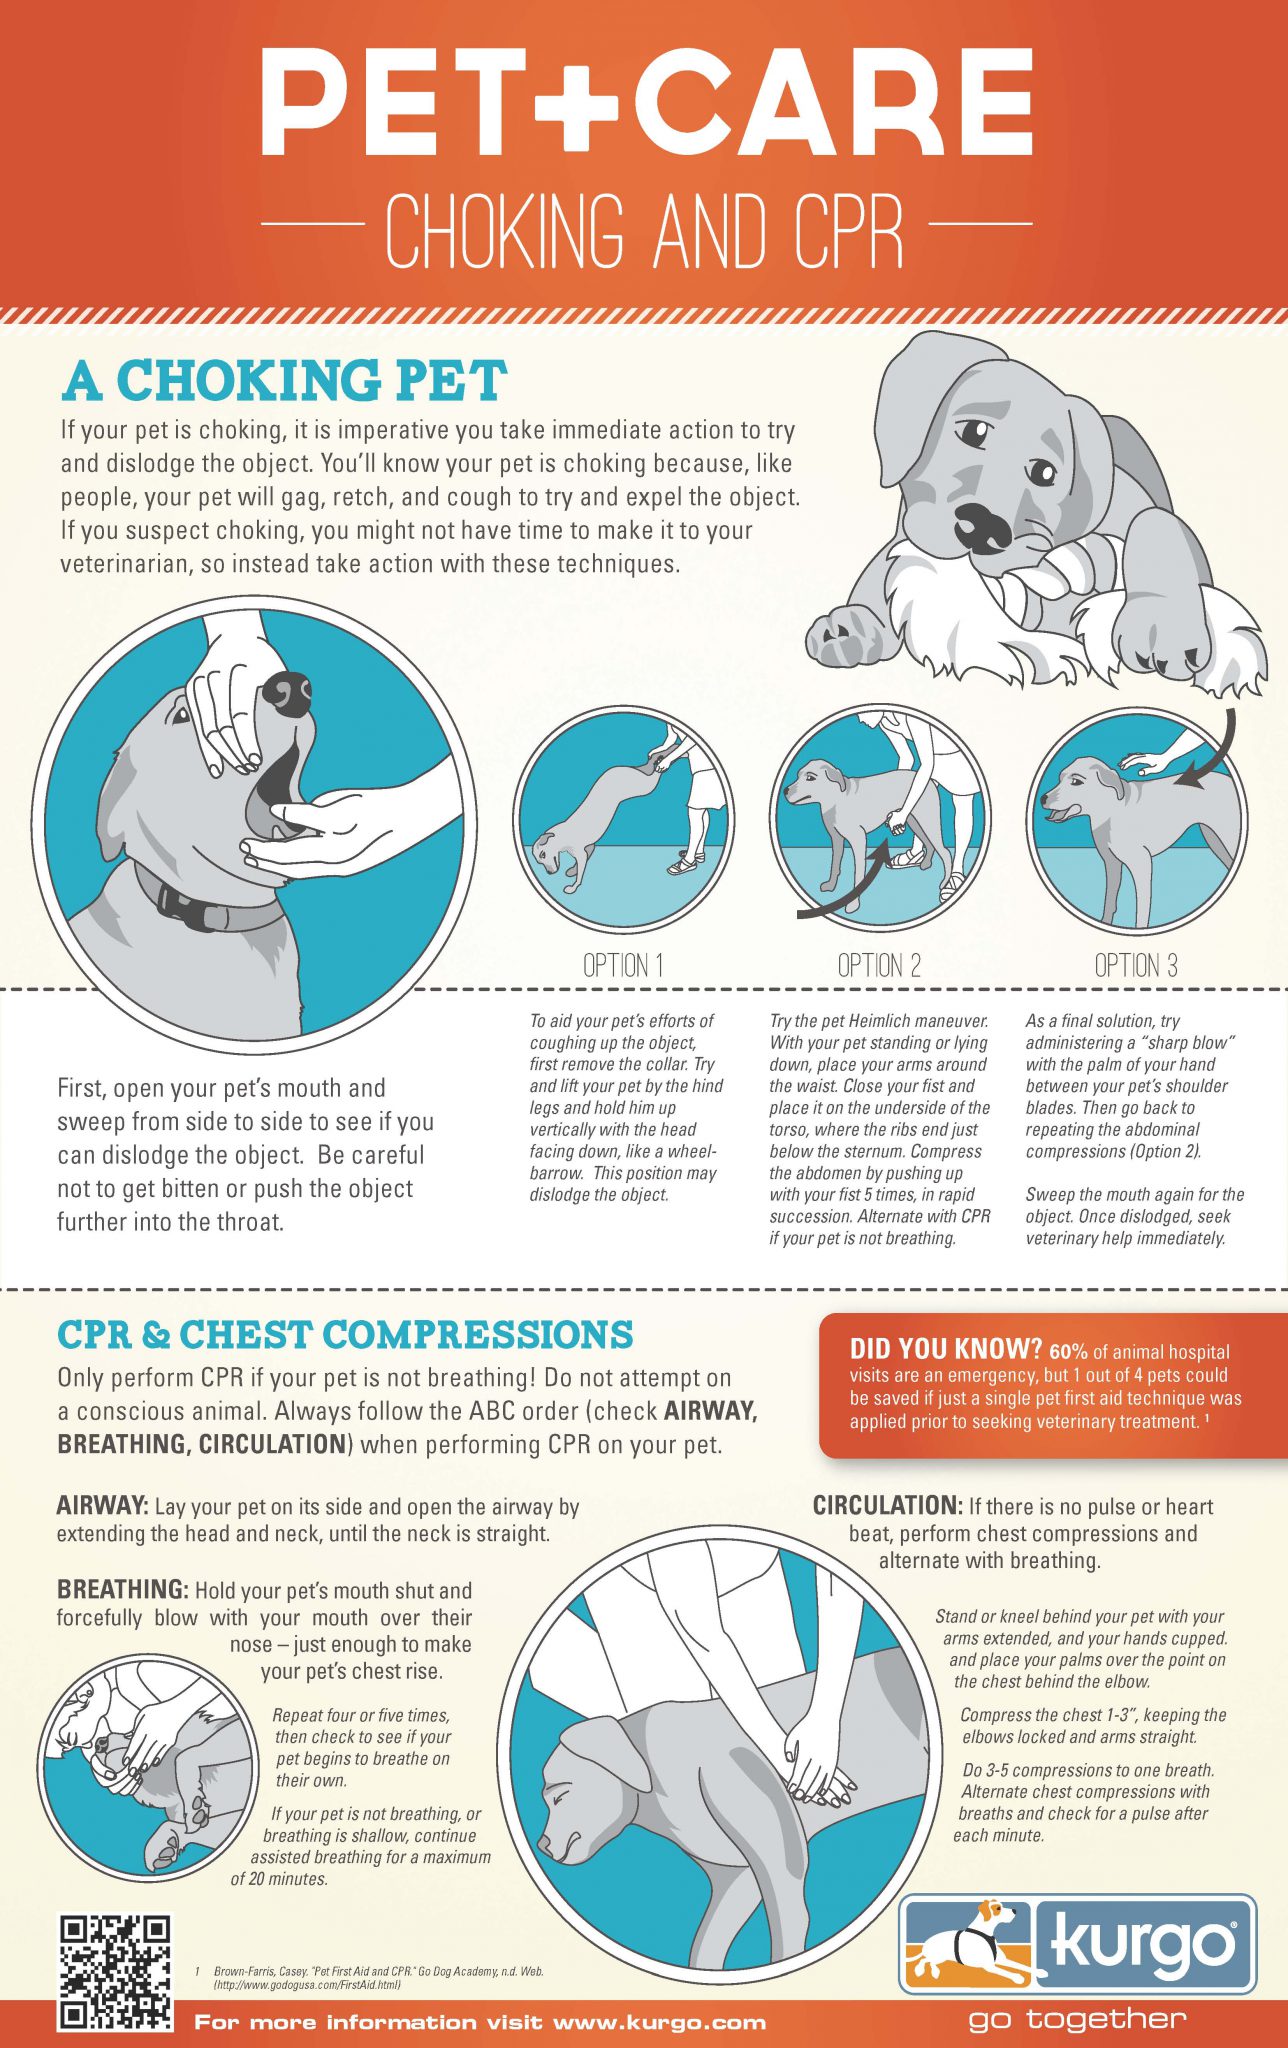
Before doing anything you must evaluate your dog’s condition so you know what to do.
Is Your Dog Breathing?
- Hold the back of your hand or your cheek up to their nose and feel for air. Also, watch for the rise and fall of their chest.
- If they are not breathing, check their airway for any blockage. Pull the tongue forward as far as possible and remove any objects or liquids in the throat or mouth.
Does your dog have a Pulse?
- The femoral artery, located on the inner thigh, is the easiest place to find your dog’s pulse. Run your hand along the inside of the hind leg until you are almost to the point the leg joins with the body. There you should feel a slight dip where the femoral artery is closest to the skin. Use your fingers (not your thumb) to press down gently and feel for a pulse.
- If you cannot feel the pulse at the femoral artery, try just above the metacarpal pad (the large, center pad) of your dog’s front paw, or directly on top of the heart.
- Your dog’s heart is located on the left side of their chest. To find it, lay your dog on their right side and bend the front left leg so the elbow touches the chest. The point on the chest where the elbow touches is the location of the heart.
If your dog has a pulse, but is not breathing, you can just perform artificial respiration (Skip down to Step 4 below). If your dog does not have a pulse, you will need to do CPR, or Cardiopulmonary Resuscitation, which is a combination of artificial respiration and chest compressions.
How To Do CPR On A Dog
Note: Do NOT practice CPR on a healthy dog. CPR can cause serious physical harm to dogs if performed unnecessarily. If your dog shows any signs of resistance to you performing CPR, then they may not need it!
1. Position Your Dog For Treatment
- Lay your dog on a stable, flat surface with their right side down.
- Straighten their head and neck as best you can to create a direct passage for their airway.
- Pull the tongue forward so that it rests against the back of their teeth and shut their mouth.
- Position yourself behind their back.
2. Find The Heart And Prep For Compressions
- Place both of your palms, one over the other, on top of the widest part of the rib cage, near the heart, but not directly over it.
*For smaller dogs weighing 30lbs (13.6kg) or less, cup your hands around the dog’s rib cage, placing your fingers on one side of the chest and your thumb on the other.
3. Begin Compressions
- Keeping both elbows straight, push down on the rib cage in firm, quick compressions. Only compress 1/4 to 1/3 of the chest width.
- Repeat compressions at a quick rate of 15 per 10 seconds.
*For smaller dogs, use your thumb and fingers to squeeze the chest to about a 1/4 or 1/3 of its width. Repeat this at a slightly quicker pace than for larger dogs, aiming for 17 compressions in 10 seconds.
4. Begin Artificial Respiration
If performing CPR alone, give your dog artificial respiration after each set of 15 compressions.
- Begin by sealing the dog’s lips. Place your hand over the dog’s muzzle and ensure the mouth is completely closed.
- Next, place your mouth over the dog’s nostrils and blow gently, watching for the chest to lift and expand. If the chest does not rise, blow harder into the nostrils and check that the mouth is properly sealed.
*For smaller dogs, place your mouth over their entire muzzle. - Remove your mouth from the nose/muzzle between breaths to allow for air return.
- Administer one breath for every 15 compressions.
*If there are two people available to perform CPR, have one person do the compressions, while the other gives artificial respiration after every 5 compressions.
If you are only performing artificial respiration, follow the same procedure as above for sealing your dog’s mouth, and administer one breath every two to three seconds at a steady pace of 20 to 30 breaths per minute.
5. Administer An Abdominal Squeeze
- Place your left hand under your dog’s abdomen, and your right hand on top. Push down to squeeze the abdomen and assist in the circulation of blood back to the heart.
- Give one abdominal squeeze after each set of 15 compressions and one breath.
6. Repeat
Continue CPR or artificial respiration until the dog starts to breathe on its own and has regained a steady pulse. If the dog is not breathing after 20 minutes, it’s time to consider discontinuing treatment, as it is not likely you will have success after this point.
Precautions
CPR is a physically intense procedure that when performed can cause additional injury to your dog. These injuries can include broken ribs, pneumothorax (also known as a collapsed lung), and overall stress to your dog’s body. However, these injuries are treatable by a veterinarian, so it is not necessary to stop CPR for fear of harming your pet further. If you suspect that you may have broken a rib or otherwise injured your dog, simply continue with softer compressions.
Again, CPR and artificial respiration are NOT to be practiced on a healthy dog. However, it is recommended that you review some of the basics of the procedures so you will know how to perform them should your dog encounter one of the life-threatening situations mentioned in this article by Pets WebMD. Go ahead and practice finding your dogs pulse and location of the heart, but do not perform compressions! In addition, have a list of local emergency veterinarian offices in an accessible location or saved on your phone. Know their locations and which would be most convenient in an emergency.
Classes and Training
If you want hands-on training or more in-depth, visual demonstrations, there are many options available.
- Watch a dog CPR video, like this one, in which Elaine Acker, CEO of Pets America, demonstrates CPR for dogs, in detail.
- Take a dog CPR class. Many pet-focused companies offer classes to learn pet first aid, including dog CPR. Pet Tech offers an 8-hour program taught by a certified instructor in your area, that teaches a variety of first aid skills and offers a certificate once the program is completed. The Red Cross also offers courses, some of which are online.
- Talk to your veterinarian. At your next appointment, ask to go over the pulse points on your dog and discuss emergency best practices for your specific breed, size and weight.
Preparation can be the difference between saving your dog’s life and running out of time. Save this guide and share with other dog owners to ensure that every dog has the chance to enjoy another day.
Source: PetMD
The information contained in this article and website is not intended nor implied to be a substitute for professional safety advice; it is provided for educational purposes only.
Download these infographics and save for quick reference: